In the previous post I have demonstrated part of the Sentinet, its UX and the management side of it that shows how to build SOA solution using the concept of service virtualization.
In this post I would like to discuss and highlight some other management aspects like monitoring. I will do this by further modifying my sample and setting up a new virtual service that will expose a REST endpoint instead of SOAP. My actual WCF Service will remain the same SOAP service. So I will share the experience of the leveraging Sentinet ability to perform mediation between REST and SOAP. Subsequently I will also show how messages send to a virtual service can monitored.
First step is to create a REST virtual service. You log in the administration console. Subsequently you navigate to virtual services Repository tree element, click add virtual service and select REST. Provide the service with a useful name and click OK. Next step is to design the virtual service. A virtualization structure is required to be designed as you can recall from my previous post. So you click the Design tab to show the Virtual Service Design surface. Subsequently you click modify to start designing. To virtualize the Version 1 of your WCF service you drag-and-drop the Version 1 tree element on to the IVirtualInterface surface.
Now a hosting environment for the Virtual Service needs to be assigned (you need to define where Virtual Service will be hosted). Virtual Services can be hosted on one or more Sentinet Nodes through one or more endpoints. Each Virtual Service Inbound endpoint can be configured with its own transport and policies. To host your service on the New Node select the New Node in the Repository tree and drag-and-drop it on to the “Inbound Endpoints” surface (in this case the SteefNode).
You now need to specify the endpoint addresses, where you have to add a policy. The Add Policy Wizard will display a hierarchical structure of registered shared policy templates. You can select the WebHttpBinding (Default) policy and click Finish.
You will now have your endpoint configured like below.
Next step is to map the REST operations of the virtual service to SOAP operations of the WCF Service. To perform this mapping I will have to modify the SELECT virtual operation of my REST service that virtualizes the same operation of the WCF SOAP Service.
By default virtual REST operations are configured with one-to-one mapping to virtualized SOAP operations. REST operations are expected to post XML requests in HTTP message body so that they will be passed-through to SOAP operations after adding SOAP envelope and security SOAP headers if SOAP service requires them (see screenshot above). In my scenario I will change my REST service operation to send request via HTTP GET method and to send actual message data with HTTP GET query parameters:
/Search?n={number}
I will uncheck pass through, click the Generate Template Message and change the content like below:
With this change I have instructed RESP operation to expect /Search?n={number} HTTP GET request, where {number} is the variable name whose value be will replaced in the outgoing SOAP message exactly where the same variable name is used. Sentinet helps to generate XML representation of expected SOAP message in a form of template message. Here is an example how mapping will be happening at runtime.
Now the access control to the virtual service needs to be defined. For simplicity in this sample the access to the service will be for anyone. The Everyone Access Rule is available with the default product installation. The Access Control is driven by the Access Rules located under the Access Rules folder in the Repository tree. You can expand the Access Rule folder in the Repository view. Drag-and-drop the Everyone Access Rule on the root of the Virtual Service tree and will be assigned to your service with the Permit permission. The final step for the virtual service is to promote it to an Active state.
Now that the service is up I can test it. I will use Fiddler to test the REST endpoint. In Sentinet I select the virtual service version 1 and I can lookup the endpoint address.
In Fiddler you can select composer and specify the endpoint address.
Click execute to see what will happen.
As you can see I am getting a response back.
Now I will switch over to the monitoring side. Sentinet enables you to monitor traffic coming in and out, performance metrics, activity metrics (successful calls, unsuccessful calls,message sizes, total messages, and so on (see Monitoring Sentinet). In this scenario I am interested in messages coming in, subsequently being transformed in a SOAP call to the database and the response messages.
First I will go back to the Sentinet Administrative console. Select Version 1 of the REST Running Service in the Repository tree and click the Monitoring tab. The first thing you will see if you do this is the real-time monitoring data at 5 seconds intervals being displayed.
The tab called Logs is the next one I will click to see what has been logged.
A list of transactions that occurred during the time interval observed by the graph will be displayed (you can expand the Search panel to search for transactions at a specified time interval). When you click the [+] located next to each transaction it will expand the selected transaction.
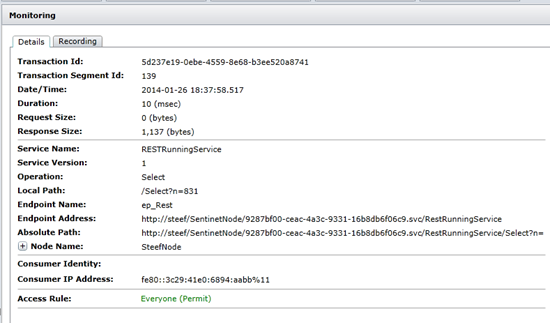
Above you can see a very detailed view of how the transaction was transmitted from the client application (Fiddler) to the my REST endpoint. If I double click the RESTRunningService than the details of that part of the transaction will be shown.
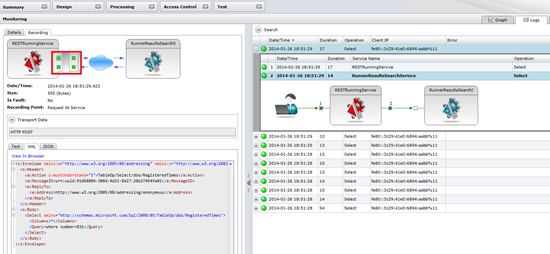
The Sentinet Node will get the new specified monitoring settings with its next heartbeat. When I send more message through Fiddler the payloads will now be recorded. If I go back to monitoring and select Logs I can select one of the recent messages and select the RunnerResultsSearchService (SOAP).
In next part I will discuss the capabilities of Sentinet in combination with BizTalk Server.
Cheers,
Steef-Jan


